
Sending emails back and forth with potential customers just to find an appointment time is a huge waste of time that often leads to lost sales. When you’re stuck managing a calendar all morning, you can’t focus on actually serving your clients.
That’s why I recommend accepting appointments directly on your WordPress website. This can save you hours every week and keep leads from falling through the cracks.
I’ve tested several scheduling tools, and I found that Sugar Calendar Bookings is the best way to automate your bookings. It’s powerful enough to handle complex scheduling, yet simple enough to set up in less than an hour.
In this guide, I’ll walk you through every step to set up a professional booking system. By the end, you’ll have a hands-free system that accepts appointments and takes payments while you sleep.
TL;DR: I recommend using Sugar Calendar Bookings to automate your appointments and keep clients on your website. The free version lets you set your hours and accept Stripe payments, while the Pro version adds advanced features like staff management and buffer times between meetings.
Here are the topics I will cover in this tutorial:
- Why Your Business Needs a WordPress Booking System
- Step 1: Installing the Sugar Calendar Bookings Plugin
- Step 2: Creating Your Professional Services
- Step 3: Setting Your Availability and Working Hours
- Step 4: Connecting Stripe for Automated Payments
- Step 5: Adding the Booking Form to Your Website
- Managing Your Booking Schedule and Growth
- Frequently Asked Questions About WordPress Booking Systems
- Additional Resources for Managing Appointments
Why Your Business Needs a WordPress Booking System
I often see business owners hit what I like to call the ‘manual booking ceiling’. This is the point where administrative busywork, like chasing down clients and trading endless emails, starts to take more time than actually running your business.
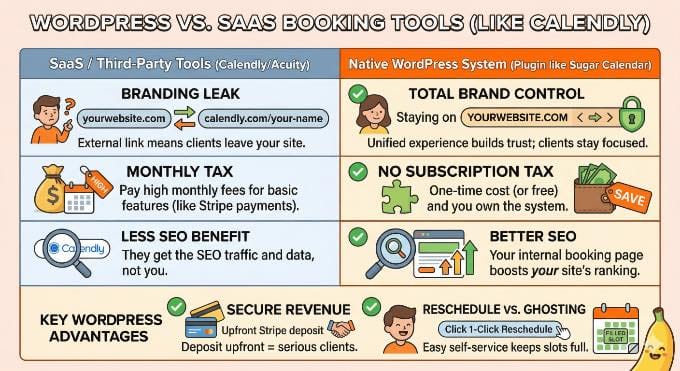
While many people start with third-party tools like Calendly, I’ve found that hosting your own booking system on WordPress offers massive advantages over using a separate SaaS platform:
- Total Brand Control: When you use an external link (like calendly.com/your-name), you send your clients away from your website. This creates a ‘branding leak’ where they lose your site’s navigation and may even see the third-party’s logos or suggested services. Keeping them on your own domain builds trust and keeps their focus on your business.
- No Monthly ‘Subscription Tax’: Most SaaS booking tools charge a recurring monthly fee for essential features like Stripe payments or custom reminders. Using a WordPress plugin like Sugar Calendar Bookings lets you own the system and keep more of your revenue.
- Secure the Revenue: Plugins like Sugar Calendar let you request a deposit via Stripe upfront to make sure clients are committed to the appointment. I’ve found this is the most effective way to filter out people who aren’t serious about your time.
- Better SEO and Analytics: When a client visits your internal booking page, it counts as traffic for your site, helping your search engine rankings. If you use an external tool, they get the SEO benefit and the customer data, not you.
When your business is small, you can get away with a paper planner or a simple contact form. But as you grow, you cannot afford to spend hours doing manual admin work instead of running your business.
By moving to an automated system, you reclaim your time and remove the friction that prevents your business from scaling to the next level.
Tip: If you don’t have a website yet, I recommend using WordPress. It is the most flexible platform for small businesses, and you can see my guide on how to start a WordPress website to get set up today.
Step 1: Installing the Sugar Calendar Bookings Plugin
Before you can start booking clients, you need to install the plugin. Sugar Calendar Bookings is a standalone WordPress plugin.
There are two versions you can choose from:
- Sugar Calendar Bookings Lite: This is the free version, and it is the one we will be using for this tutorial. It includes everything you need to get started, including free Stripe integration for accepting payments.
- Sugar Calendar Bookings Pro: This is the premium upgrade. I highly recommend it as your business grows and you need advanced features like managing multiple staff members, assigning specific working hours per employee, and creating custom email templates.
If you need help, you can see our guide on how to install a WordPress plugin.
Step 2: Creating Your Professional Services
Once the plugin is activated, the very first thing you need to do is define exactly what your clients are booking.
In Sugar Calendar Bookings, these are called ‘Services’. You can create as many as you need, such as a ’15-Minute Discovery Call’ or a ‘Full 1-Hour Consultation’.
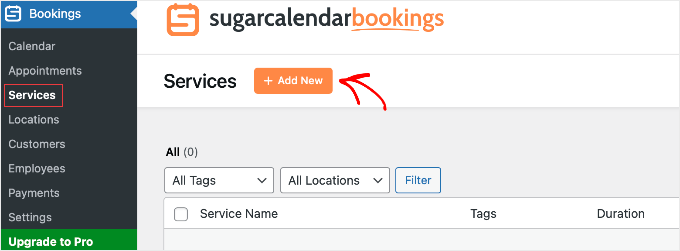
To get started, navigate to Bookings » Services in your left-hand WordPress dashboard menu and click the ‘Add New’ button.
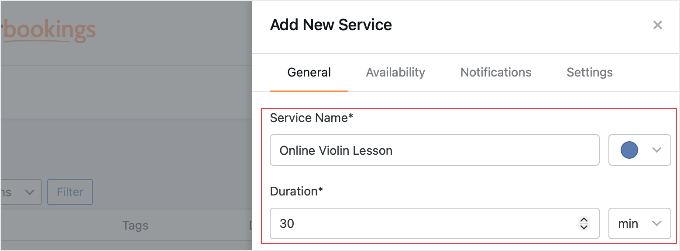
On the ‘General’ tab of this screen, you will start by entering your Service Name. I recommend choosing a clear, descriptive title that clients will instantly understand, such as ’30-Minute Discovery Call’ or ‘Full Website Audit’.
Next, you will set the exact Duration of the appointment in minutes. It is important to be accurate here so the plugin knows exactly how much time to block off on your calendar to prevent double-booking.
Next, you need to set the Location.
If you meet clients virtually, you can click ‘Add Location Option’, select ‘Custom Link’, and paste your Zoom, Google Meet, or Microsoft Teams URL right here.
Don’t worry about doing timezone math. The booking calendar will automatically display your availability in your client’s local timezone.
If you have a physical office, you can enter your street address instead.
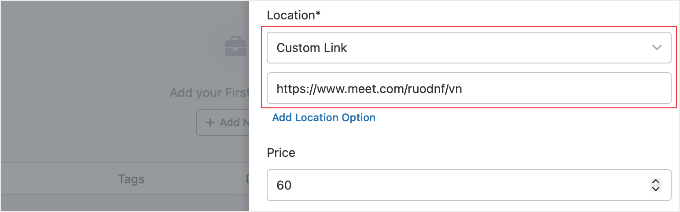
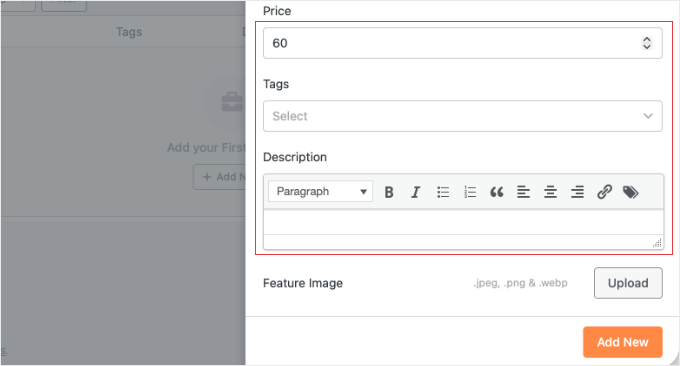
Below that, you can set the Price and add a Description.
I always use the description area to be very clear about my payment terms. For example, if I am only charging a small fee upfront, I make sure to state that it is a ‘Non-refundable Deposit’ so there are no surprises for the client.
If you are using the Pro version, you can explore the other tabs inside the Service editor (like specific Service Availability and Notifications) to assign specific staff members to the service or set up custom email templates.
Once you are finished, click the ‘Add New’ button at the bottom to save your service.
Most businesses offer more than one type of appointment. If you have other offerings, simply repeat this process to add them to your catalog. You can create as many unique services as you need for your business.
Step 3: Setting Your Availability and Working Hours
One of the biggest mistakes I see business owners make is leaving their calendar wide open. Without the right boundaries, you might end up with clients trying to book a consultation at 9:00 PM on a Friday.
To prevent this and set your standard business hours, navigate to Bookings » Settings and click on the ‘Availability’ tab.
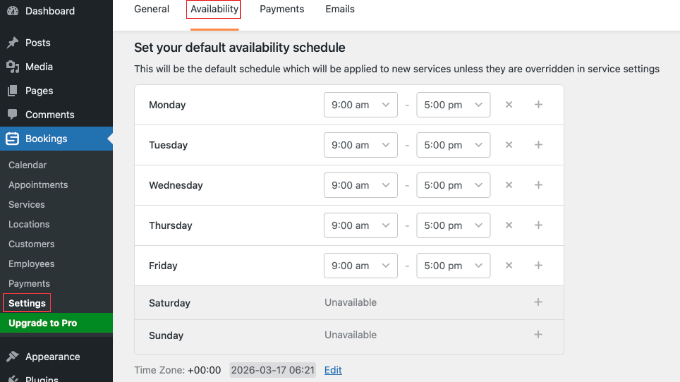
Here, you can fine-tune exactly when you are available for appointments on a day-to-day basis. You can use the dropdown menus to set your open hours for Monday through Friday (for example, 9:00 am to 5:00 pm) and click the toggle to mark Saturday and Sunday as ‘Unavailable’.
Pro Tip: While you are configuring your schedule, scroll down to the ‘Date Overrides’ section. I recommend using this feature right away to mark upcoming holidays, vacations or personal days as unavailable so no one can book you when you are out of the office.
Once your hours look correct, don’t forget to click the ‘Save Settings’ button at the bottom of the screen.
Note: If your business requires advanced scheduling rules, you will need to upgrade to Sugar Calendar Bookings Pro. The Pro version unlocks Buffer Times (which automatically add a cushion of time before and after appointments so you can prepare) and Notice Periods (which prevent clients from booking a surprise meeting right before it starts).
Step 4: Connecting Stripe for Automated Payments
Once your services and hours are ready, you need a way to get paid. Collecting payments upfront is the best way to reduce no-shows and secure your income.
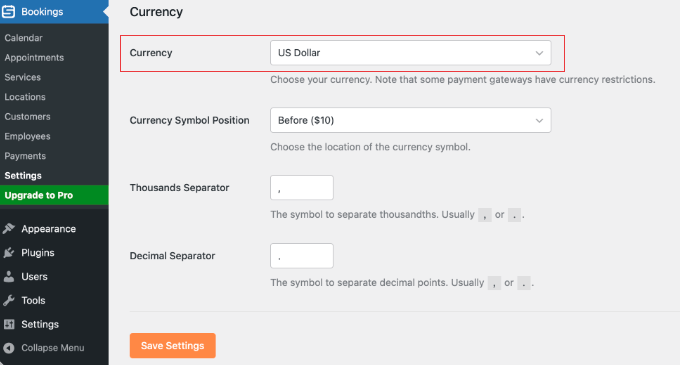
To set this up, go to Bookings » Settings and click on the ‘Payments’ tab.
Before you connect your bank account, I highly recommend scrolling all the way to the bottom to the ‘Currency’ section. Choose your local currency, and click the ‘Save Settings’ button. It is best to do this first so you don’t lose your changes during the next step.
Next, scroll back up to the ‘Stripe’ section.
You will notice that the free plugin uses a pay-as-you-go pricing model, which adds a small 3% fee per transaction. Keep in mind that this is in addition to Stripe’s standard processing fees (usually 2.9% + $0.30 per transaction).
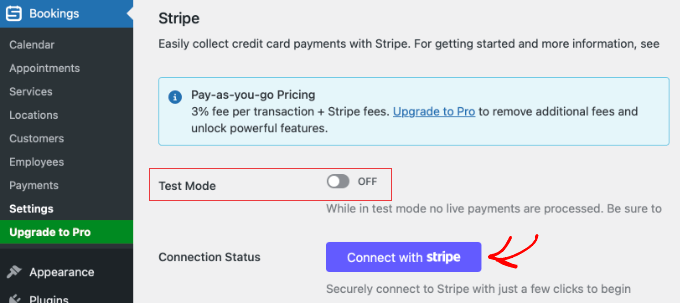
If your business processes a lot of appointments, upgrading to Sugar Calendar Bookings Pro will remove the 3% plugin fee entirely. This keeps more money in your pocket.
Expert Tip: I recommend doing a quick ‘math check’ on your booking volume. If you are processing more than a few thousand dollars in bookings per year, the 3% plugin fee will cost you more than the annual price of a Pro license. Switching to Pro at that point actually saves you money every month.
To link your bank account, simply click the blue ‘Connect with Stripe’ button. This will securely redirect you to Stripe to finish the setup.
Step 5: Adding the Booking Form to Your Website
You have done the hard work of defining your services and setting your hours. Now for the exciting part: putting the calendar on your website so clients can actually start booking your time.
To do this, create a new WordPress page. You might name it something welcoming like ‘Schedule an Appointment’ or ‘Work With Me’. Inside the WordPress block editor, click the ‘+’ icon and search for the ‘Booking Form’ block to add it to your page.
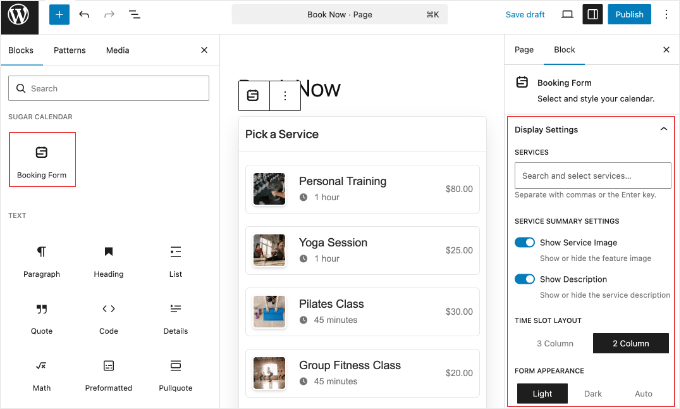
Once you insert the block, look at the settings panel on the right side of your screen. There are a few easy toggles to make sure the form perfectly matches your website’s design:
- If you are building a dedicated booking page, the ‘3 Column’ time slot layout looks fantastic. If you are squeezing the calendar into a narrower space, you can easily switch it to ‘2 Column’.
- You also have the option to flip between ‘Light’ and ‘Dark’ themes, or filter the form to only show one specific service instead of your whole catalog.
When you are happy with how it looks, go ahead and click the ‘Publish’ button.
Before you share the link with your audience, I highly recommend opening the live page on your mobile phone. I’ve found that many booking plugins have heavy designs that break on small screens. However, Sugar Calendar’s time-slot grid is lightweight and stays easy to tap.
Since most of your clients will be booking you from their phones, seeing this mobile-friendly layout in action will give you total peace of mind.
While you are testing it on your phone, go ahead and book a dummy appointment to see exactly what your clients will experience. Once you confirm the Stripe test payment goes through smoothly, simply head back to Bookings » Settings » Payments and toggle ‘Test Mode’ to OFF.
Congratulations! Your automated WordPress booking system is now officially live and ready to start accepting appointments.
Managing Your Booking Schedule and Growth
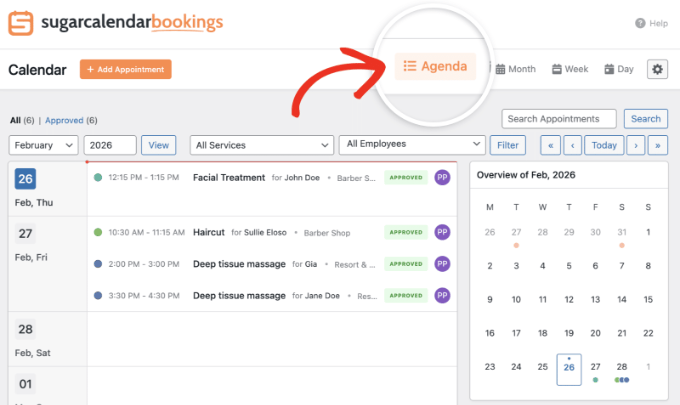
Once your system is live, you can manage your day-to-day operations from the Bookings » Calendar screen.
I find the ‘Agenda View’ is the best way to see my daily schedule at a glance without feeling overwhelmed by a monthly grid. You can even click the gear icon in the top right corner to hide days you don’t work (like weekends) for a cleaner look.
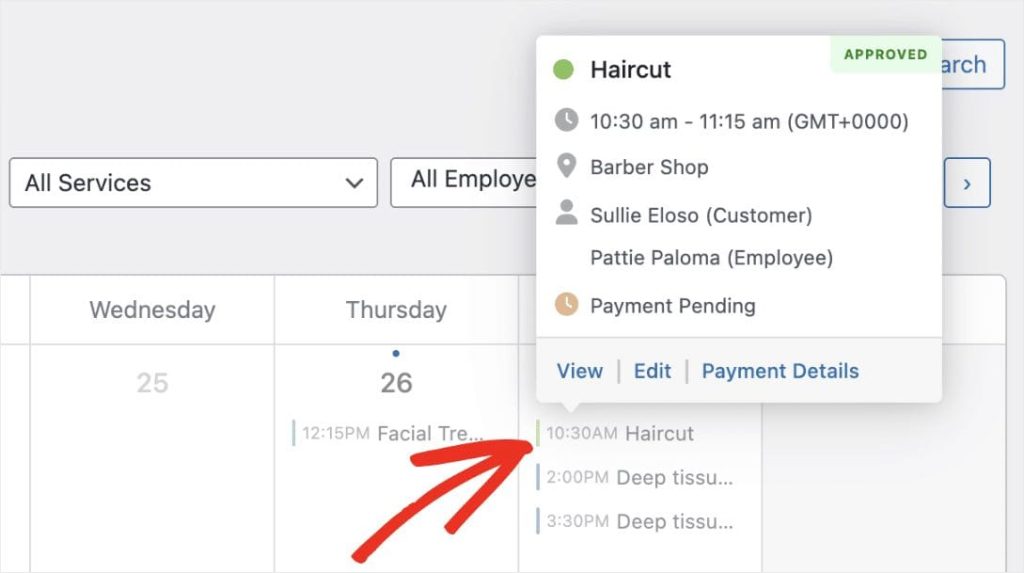
If you need to check who you are meeting with, simply click on any appointment on the calendar.
A quick popup will appear showing the client’s details, the service, and their payment status, saving you from having to load a completely new page.
If a client calls or emails you to book an appointment directly, you can manually add them by clicking the ‘+ Add Appointment’ button at the top of the calendar.
I make it a habit to do this immediately for every manual booking. It makes sure your availability stays 100% accurate and prevents those awkward double-booking situations.
Finally, I recommend keeping an eye on your main WordPress dashboard.
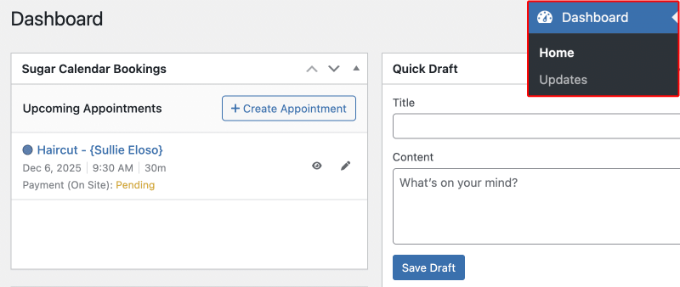
I’ve noticed that most users stop relying on email notifications once they see the Sugar Calendar Bookings ‘Revenue Widget.’ It gives you a clear look at your upcoming appointments and total earnings the second you log in. It’s a great motivational tool as your business grows.
Frequently Asked Questions About WordPress Booking Systems
I know that setting up an automated calendar can feel like a big shift for your business. Here are some of the most frequent questions I receive about using WordPress booking systems and Sugar Calendar Bookings.
Do I need the core Sugar Calendar plugin to use the Bookings system?
No. Sugar Calendar Bookings is a completely standalone WordPress plugin. You do not need to install the original Sugar Calendar ‘Events’ version for these appointment features to work on your website.
Can I accept customer payments for WordPress appointments without using Stripe?
Yes. While Stripe is the native integration for credit cards in Sugar Calendar Bookings, you can also enable ‘On-Site’ payments in the plugin’s settings. This is a great option if you prefer to collect cash or checks in person at the time of the meeting.
How do I prevent clients from making last-minute bookings?
To prevent last-minute surprises, you can set a ‘Notice Period’ using Sugar Calendar Bookings Pro. By requiring 24 or 48 hours of lead time, the booking system makes sure you never have an appointment appear on your calendar without enough time to prepare.
Is Sugar Calendar Bookings compatible with my WordPress theme?
Yes. The Sugar Calendar Bookings forms are designed to be lightweight and will automatically use the fonts and colors of your active WordPress theme. The system also includes built-in support for dark mode designs.
Can I sync my WordPress booking system with Google Calendar or iCal?
Yes. Sugar Calendar Bookings allows you to sync your WordPress appointments with external calendar applications like Google Calendar, iCal, and Outlook. This makes sure that you can see your upcoming bookings across all your personal devices.
What is the best free booking plugin for WordPress?
I believe Sugar Calendar Bookings Lite is the best free appointment scheduling plugin for WordPress. Unlike many free alternatives, Sugar Calendar Bookings Lite includes built-in Stripe payment processing, mobile-friendly booking forms, and custom date overrides without requiring a paid upgrade.
How can I test the booking system before going live?
I always recommend enabling ‘Test Mode’ in your Stripe settings first. This lets you complete the entire booking and payment process using a fake credit card number. It is the best way to see exactly what your clients see and make sure your confirmation emails are working before you start taking real payments.
Additional Resources for Managing Appointments
I hope this guide helped you learn how to set up a professional booking system on your WordPress site. By automating your calendar, you have taken a major step toward reclaiming your time and growing your business.
To further improve your site’s professional workflow, you may also want to see these additional resources:
- How to Send SMS Messages to Your WordPress Users – Learn how to add text reminders to your booking system to further reduce no-shows.
- How to Create a Contact Form in WordPress – A great way to handle general inquiries that don’t require a full appointment.
- How to Set Up WP Mail SMTP – Essential for making sure your booking confirmation emails actually land in your client’s inbox.
- Best WordPress Appointment and Booking Plugins – A comparison guide if you need to see how Sugar Calendar Bookings stacks up against other options.
- Must-Have WordPress Plugins for Business Websites – My top picks for the tools every professional service business needs.
If you liked this article, then please subscribe to our YouTube Channel for WordPress video tutorials. You can also find us on Twitter and Facebook.
The post How to Setup a WordPress Appointment Booking System & Book Clients 24/7 first appeared on WPBeginner.